• about me
  • menu
  • categories

  • I wanted to take a moment to say thank you ....

    I may have said this in the odd blog or Instagram post, but I felt like it was time to really sit down and let everyone know how grateful I am.

    I started this blogging and Instagram thing as a bit of fun and because it was a great avenue for me to get my creative on outside of studying - that was back in August 2015!

    Since then my little corner of the Internet has grown, and while this isn't my full-time thing and frankly may never be so, I've always enjoyed having it on the side as something else to do outside of work or study and having a space to embrace my love for all things beauty, fashion and lifestyle.

    But through the support of all of you and the generosity of many brands and companies, I've had some amazing opportunities and continue to do so because of this space - so thank you! 

    After taking on full-time work recently and trying to complete a dissertation to finish my Masters degree I've had moments where I've wondered if it's time to take a break, put this on pause or maybe step away for a longer period of time - which is why you may have noticed if you follow me over on Instagram, that there's been times I've gone a couple of days without posting, especially on the weekends; ya gurl needs a break sometimes.

    I've had many moments where I look at my Instagram feed in particular and I'm sad and disappointed its not as exciting as some other people's feeds - that I don't have lots of cool shots in cool locations or time to play around with edits - but that's just it, unfortunately time is limited for me if I'm to get all my other commitments sorted, take of myself, keep a social life going and actually just chill out every now and then.

    However whenever I take a break and step away, even for a few days, I do find some of the excitement for this reignited in me and I always come back. I think for me it's about realising that this isn't my full-time thing and therefore it's okay to not be on top of everything all the time, posting everyday and spending every spare minute I have left putting together content - there are certainly weeks I do that, but I've realised it's not healthy to be doing that when I've got many other things pulling me in different direction and requiring a fair chunk of my time and commitment.

    So thank you also for hanging around when I do go quiet for a moment or two - here's to another three years of content!

    . 9/27/18 .

    A moment to say thank you

    . 9/27/18 .


    I wanted to take a moment to say thank you ....

    I may have said this in the odd blog or Instagram post, but I felt like it was time to really sit down and let everyone know how grateful I am.

    I started this blogging and Instagram thing as a bit of fun and because it was a great avenue for me to get my creative on outside of studying - that was back in August 2015!

    Since then my little corner of the Internet has grown, and while this isn't my full-time thing and frankly may never be so, I've always enjoyed having it on the side as something else to do outside of work or study and having a space to embrace my love for all things beauty, fashion and lifestyle.

    But through the support of all of you and the generosity of many brands and companies, I've had some amazing opportunities and continue to do so because of this space - so thank you! 

    After taking on full-time work recently and trying to complete a dissertation to finish my Masters degree I've had moments where I've wondered if it's time to take a break, put this on pause or maybe step away for a longer period of time - which is why you may have noticed if you follow me over on Instagram, that there's been times I've gone a couple of days without posting, especially on the weekends; ya gurl needs a break sometimes.

    I've had many moments where I look at my Instagram feed in particular and I'm sad and disappointed its not as exciting as some other people's feeds - that I don't have lots of cool shots in cool locations or time to play around with edits - but that's just it, unfortunately time is limited for me if I'm to get all my other commitments sorted, take of myself, keep a social life going and actually just chill out every now and then.

    However whenever I take a break and step away, even for a few days, I do find some of the excitement for this reignited in me and I always come back. I think for me it's about realising that this isn't my full-time thing and therefore it's okay to not be on top of everything all the time, posting everyday and spending every spare minute I have left putting together content - there are certainly weeks I do that, but I've realised it's not healthy to be doing that when I've got many other things pulling me in different direction and requiring a fair chunk of my time and commitment.

    So thank you also for hanging around when I do go quiet for a moment or two - here's to another three years of content!

    . 9/24/18 .


    For the past few months I've been considering getting my eyebrows microbladed - for those who don't know what mircoblading is, it's basically getting your eyebrows tattooed onto your face. My eyebrows, while not terrible, were quite light coloured so they looked a lot more sparse then they actually were when I didn't fill them in. There were also a few patchy spots, particularly towards the front of my brows. Well it seems the universe heard my calls because not long after I began considering it, the wonderful team from Sydney College of Hair & Beauty reached out and asked if I wanted to come in and get them done - you know I said yes.

    My brows were done by the head of the College, Zara Naderi, while two students watched her technique.

    If you don't know what mircoblading is, basically the brow technician uses a thin blade with some pigment on it and will cut very fine lines into your brow area to basically tattoo on lines that will look like brow hairs. While I have been calling it a tattoo for simplicity sake, microblading is a bit different as the cut, and therefore the pigment, doesn't go as deep into your skin. So they will fade over a span of 1 - 2 years, making them a more semi-permanent tattoo. Personally I think this is great because I feel like the brow trend is changing all the time and if you find yourself getting over the shape you have or just don't end up loving having your brows permanently on fleek, you can know you will eventually be able to change it.

    The great thing about the mircoblading process is that it can be done to suit all types of brows - whether you want something a little more subtle, if you need a minor fill in or a major fill in.

    So what is the process like?
    When I first arrived, the first thing Zara did was apply numbing cream. After she talked through the process with her students, I was taken into the beauty room and Zara began drawing up the shape of my brows. She really took her time using her measurement technique to make sure the arch and various points of my brows sat where they should for the shape of my face. She then showed me for me approval - she nailed it! 

    After that we picked which colours to use. Zara had a chart which helps narrow down the colour range based on my hair colour and skin tone. We picked out three and Zara rubbed each on my forehead to show me the shades - something to remember when picking your colour: it will fade about 50% once it has healed, so it can be ok to lean towards a darker shade if you're not sure. We ended up choosing three different shade to help give my brows a more natural, ombre effect.

    Zara also spent some time cleaning up my brows. I've never really had my brows professional shaped or trimmed before so I was also pretty impressed with her handiwork here. 

    Then the mircoblading again...

    I have to say, it bloody hurt! I did have numbing cream applied beforehand, but I have a feeling it may have worn off or I may just need to have more applied next time, but it certainly wasn't the most comfortable experience - but pain is beauty right! Also I have quite a low pain threshold.

    So there were a few different techniques used during my appointment, and depending on what you want and need will depend on what techniques might be used on you. I had the mircoblading done and Zara also used a tattoo gun on the tail end and middle of my brows to give them a little bit of shading so they have a more filled-in look rather than just the brow-like strokes. My process took a little longer than usual as Zara was going a little slower and stopping at times to explain and show things to the students, but most people say their sessions last an hour or so.

    Aftercare
    When it comes to looking after your new brows directly after your appointment, you basically want to avoid them having contact with anything for at least a week - water, skincare products, sunscreen, hair products, etc. Even once they're healed up it's best to try and avoid ever rubbing them with any products to help with their longevity.

    The only thing you should be putting on them as they heal is Bepanthen cream - but don't go to crazy. A tip Zara told me was to give your brows some time to breath and air out before applying a new layer of cream. I did this by just applying some in the morning before I left the house and at night before bed.

    By the second day after my appointment they had certainly darkened up, which I knew was going to happen so it wasn't to shocking. Halfway through the following week my brows has scabbed up and some of the scabs were starting to fall off, in fact once I hit a week after my appointment most of the scabbing had come off (it was so hard to resist the temptation to just peel them off myself, but avoid this at all costs or you might end up peeling away the pigment as well!). I didn't experience any sort of pain during the healing process, though some sections were slightly tender the next day but that cleared up within a couple of days. The only other thing you may notice is that your eyebrows start to get itchy as they scab - DO NOT SCRATCH!

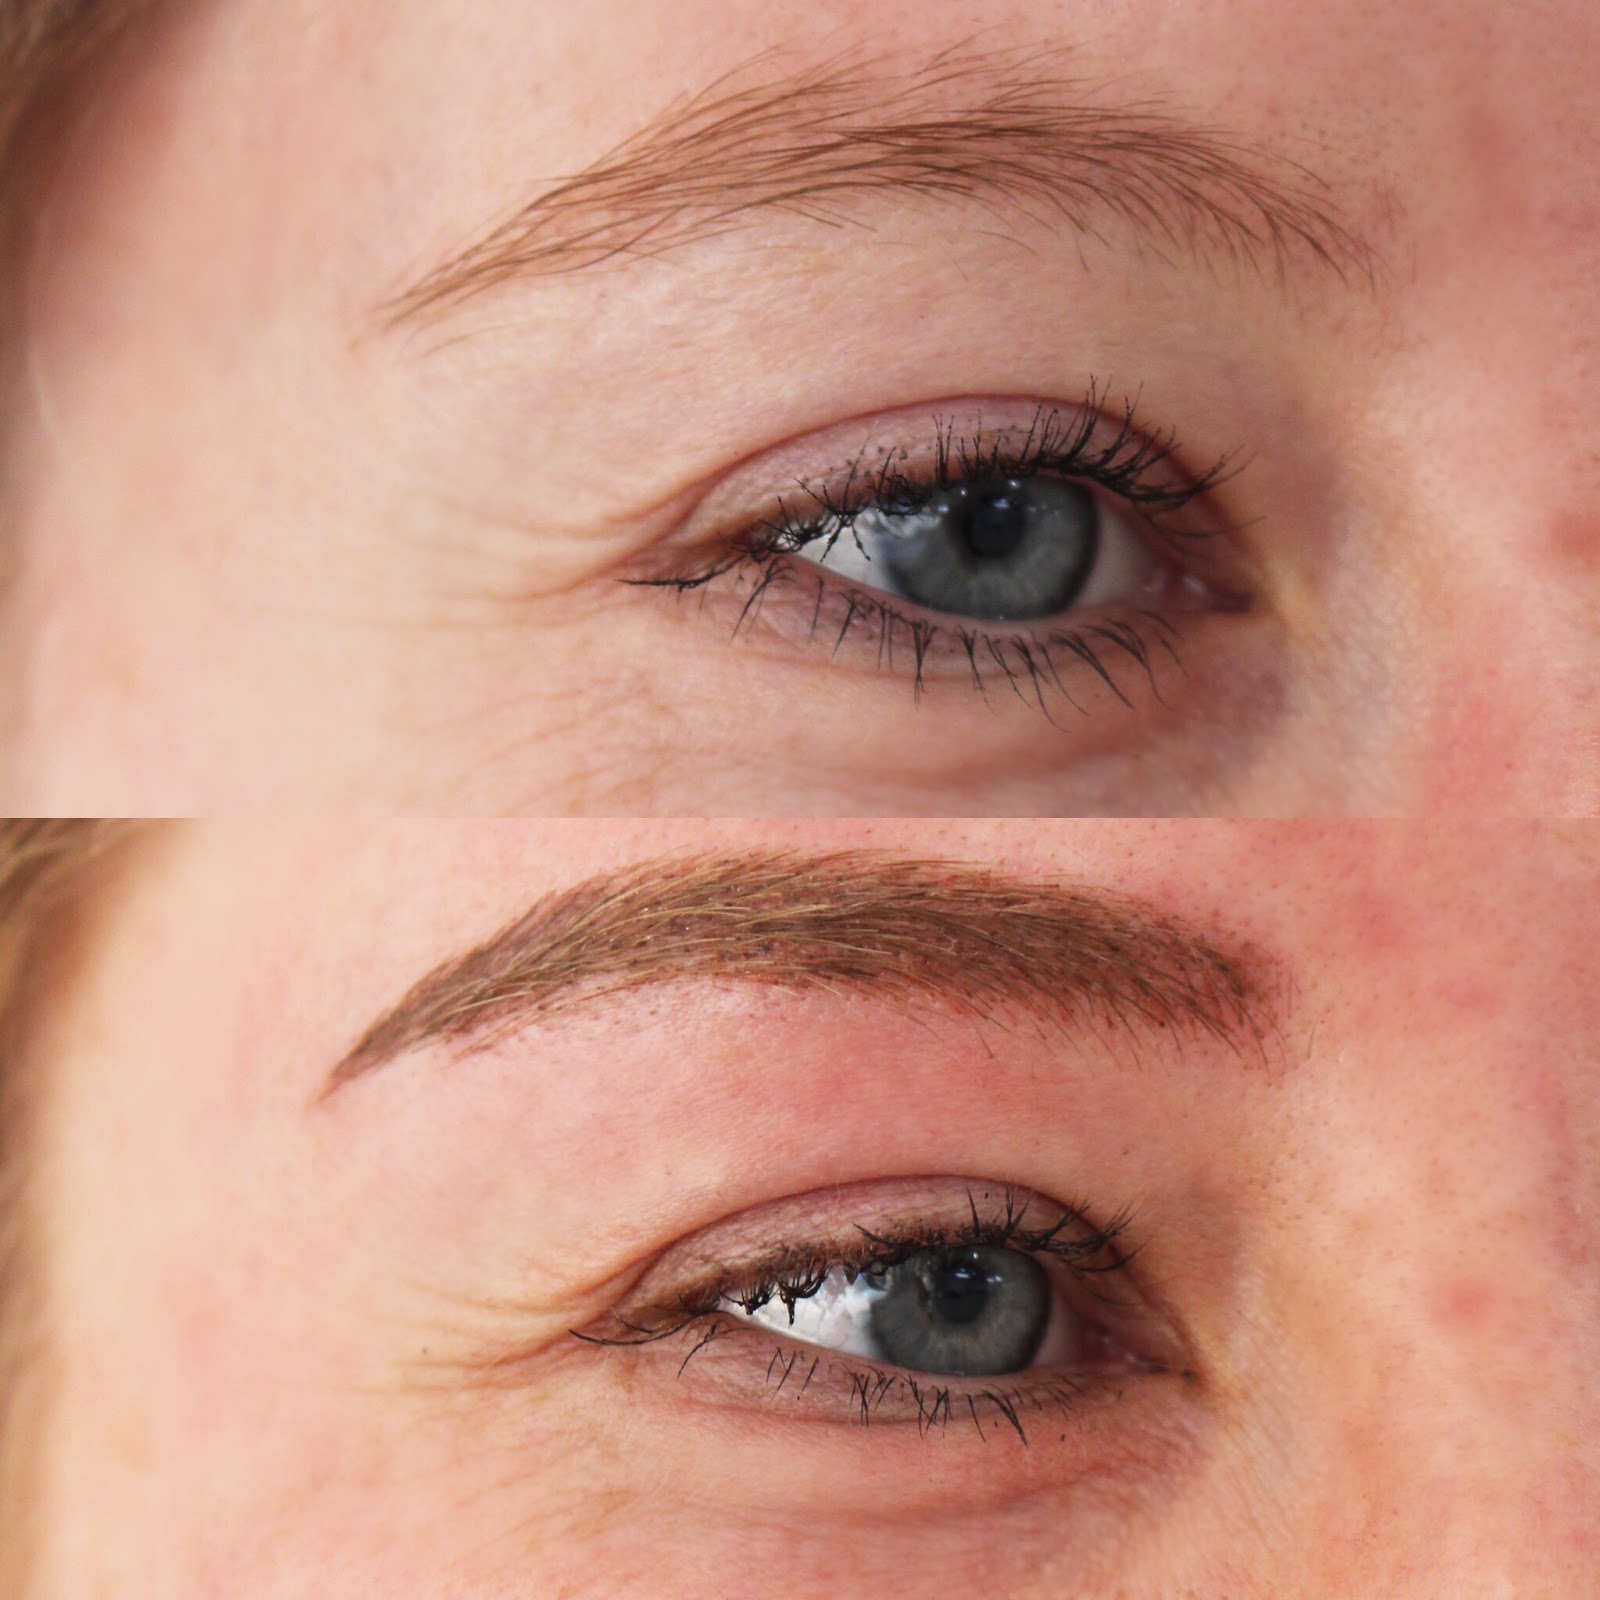
    I'm currently sitting at three weeks since my appointment and I've popped a photo below of their healing progress. The top is the day after my appointment and the bottom photo was around two weeks out, and they have pretty much stayed the same since.


    As you can see my result is a brow that isn't to dramatic but certainly has a fuller shape then previously - remembering I have zero product in them in all these pictures.

    These two photos were taken at the College, the top directly before my mircoblading and the bottom directly after my treatment - in this photo my brows don't look particularly neat because there was still a lot of excess ink sitting in the brows.


    So what's next?
    From here I will go back in for a touch-up session about 6 - 8 weeks after my first appointment. This session will be to redo any areas that didn't hold as well and make any changes/adjustments I want.

    Final thoughts...
    I have to say I've been pretty happy with them so far. While some sections of my brows haven't held as well (particularly the very front of my brows) I know that will get fixed up in my next appointment. Aside from that, it has been amazing to get out of bed each day and not have to touch my eyebrows. Even with the necessary touch ups my eyebrows are still so much better than they were before - you can actually tell I have eyebrows now without me adding makeup and they are patch free. 

    Another benefit of having them microbladed is having a permanent shape to follow to help with maintaining those pesky hairs!

    I plan to do another update after I've healed from my touch-up session and give my final conclusion on the whole process, so keep an eye out.

    . 9/23/18 .


    I've had a few Arbonne products come through my mailbox in the past, and I have to say I've always been fairly impressed with them. This time the lovely team sent me a few bits and bobs, including products from their new RE9 Advanced Prepwork range to try out. One of the great things about the new range is that part of the proceeds made from the sale of the products will go towards supporting the Arbonne Charitable Foundation's mission to empower teens.

    Gel Eye Masks

    Nothing like a good eye mask to help push the puffiness away and make you look more awake than you've ever been. Hydrating your undereyes is so important because that delicate skin often gets forgotten about and without hydration will age quicker. Most eye masks come in a packet with only two or three pairs, so I love the seemingly endless amount of product you get (60 to be exact). The tub also contains a little spatula to help you seperate and pick up the little masks, which you'll be thankful for if you have nails like me (I have poked few a holes in some of them once or twice). Containing antioxidants, omegas and phytonutrients, these masks really help to soothe and hydrate my under-eyes and because you only need to leave them on for 10 - 15 minutes, they're perfect to use in the morning before you head out the door or before that big event. 

    Soft Focus Veil Broad Spectrum Sunscreen

    With summer slowly but surely coming, having a sunscreen on hand is becoming more and more important. The sunscreen is tinted, which I love because you'll both have sun protection and a little bit of coverage on your face. This product has no scent, not even a hint of sunscreen smell, which I know will be a big bonus for a lot of people. It's also super lightweight and not oily at all and actually dries down quite matte - big fan of this one. 

    Hydrating Dew Cream

    I find this cream super hydrating! It feels quite cooling and sinks into the skin really well. The formula starts as a cream and changes to a gel as your massage it in and despite the word dew in the name, I don't find it to be overly shiny once applied, which is a great thing for an oily-skin girl like me.  The product contains lentil seed extract which helps give it a more matte finish and apple fruit extract to give your skin that hydration boost.

    Cleansing Polish

    The polish is a gel texture and has a light exfoliant to help rub away those dull and dead skin cells morning and night. The product contains lingonberry and apricot and again doesn't have any kind of scent. 


    Let it Set Refreshing Finishing Spray

    These days I'm not really wearing foundation on a regular basis like I use to and when I do I've actually gone off setting sprays. Of all the ones I've tested in the past, I've never noticed a huge difference in how my foundation stays throughout the day - just like primer, I've jumped off the setting spray bandwagon. However if setting sprays are your thing, a little bit of info about this one - this product contains Arbonne’s Pollution Shield Technology (a combination of red algae, tara fruit, and sea buckthorn seed oil) which aims to protect your skin from environmental stressors like dirt and pollution, while keeping it smooth and hydrated. 

    Sheer Glow Highlight Stick

    This is actually the second time one of these babies has made it's way into my beauty collection. Stick highlights and bronzers are something I've always have struggled with, but I find the best way to use them is to rub some product onto my finger, or even a beauty blender, and dab it into the skin to make sure I'm not removing foundation. I find the highlighter gives a more subtle glow, which is perfect for everyday wear. The bronze side is also not to dramatic and I like to add some to my cheeks on days I'm feeling like looking I've actually seen the sun lately.

    It's a Long Story Mascara

    I love testing out new mascaras because I can almost instantly tell if it's going to be a love or hate product for me. That said, I always give mascaras a few goes before I reach a verdict, I find that once they dry out that little bit they always work much better. This mascara certainly gives my lashes plenty of length, but it's not big on creating volume which isn't a huge negative factor for me, but if volume is what you're after this won't be the product for you. I find it holds up well throughout the day but still is quite easy to remove at night which I'm always thankful for - nothing worse then rubbing the crap out of your eyes at the end of each day.


    Glossed Over Lip Gloss in Calla 

    As with all the products so far this gloss as no scent and it gives a little tint of colour to your lips. I'm however not a big lipgloss fan because of their sticky texture, but if lip gloss is your thing I definitely think is one worth checking out.


    . 9/12/18 .


    Here in Australia, landlords are pretty tight with the rules around rental properties, which can make personalising them a tough gig. However there are a few, non-damaging things you can do to your rental to make it feel more like home.

    Lean your art instead of hanging it

    I got lucky this time around with my rental property in that it already had quite a few hooks attached to the walls, but sometimes you'll get properties that don't have any and where the landlord isn't going to budge on letting you put your own up - so how do you hang beautiful pieces of art that express who you are? Well you don't, you just lean it instead. Whether you put a big frame directly on the floor or put something smaller on a sideboard you have, leaning art is actually a really cool way to display your pieces and make its it super easy to move them around when you feel like it. You could also the same thing with any mirrors you have.


    Use wall decals

    I don't know if it's the same all over the world, but in Australia you cannot touch the walls of a rental at all (no painting or wallpapering) unless you end up with a cool landlord who is happy for you to go for it, but 9.5 times out of 10 you won't be able to do much to the walls of your place, and they can be pretty drab and uninspiring most of the time. If you're just itching to get something on the walls, think about opting for some decals. You can find them all over the internet in pretty much any shape or design you want and best of all, when moving day comes, you can just peel them off and no one will be any wiser you ever had anything there.


    Bring the outdoors in

    A pretty easy one but something that will instantly liven up (pun intended) and bring a breath of fresh air to your home - plants. Whether you put them in stands or on pots on the floor (just make sure they don't have holes in the bottom for dirt and water to run out and mark the floor) plants are a great way to personalise your home and bring a little sunshine and happiness to the space. They're also really versatile and when you pack up and move they can easily be integrated into your new space.

    Lay it down

    If you don't love the flooring in your home, or just feel it lacks a bit of personality, a big statement rug is the perfect thing for it. Whether you want one in your living, your bedroom, or maybe both, a nice rug that suits your personal taste will help distract from any flooring you're not a fan of and bring some easy beautiful design elements into the space - another easy one to pack up and transport to your new home whenever you move.

    Set the mood

    Another major thing you can find with rentals, especially if you have an older building, is that the light bulbs suck. They can can give off that dark orange colour that doesn't light anything and just makes the place look more drab and lifeless - a quick run to Bunnings for some white lights will fix that problem. Then you can either just leave the new and old blubs there for your landlord or unscrew them and take them with you if you need them in your next home.


    . 9/10/18 .


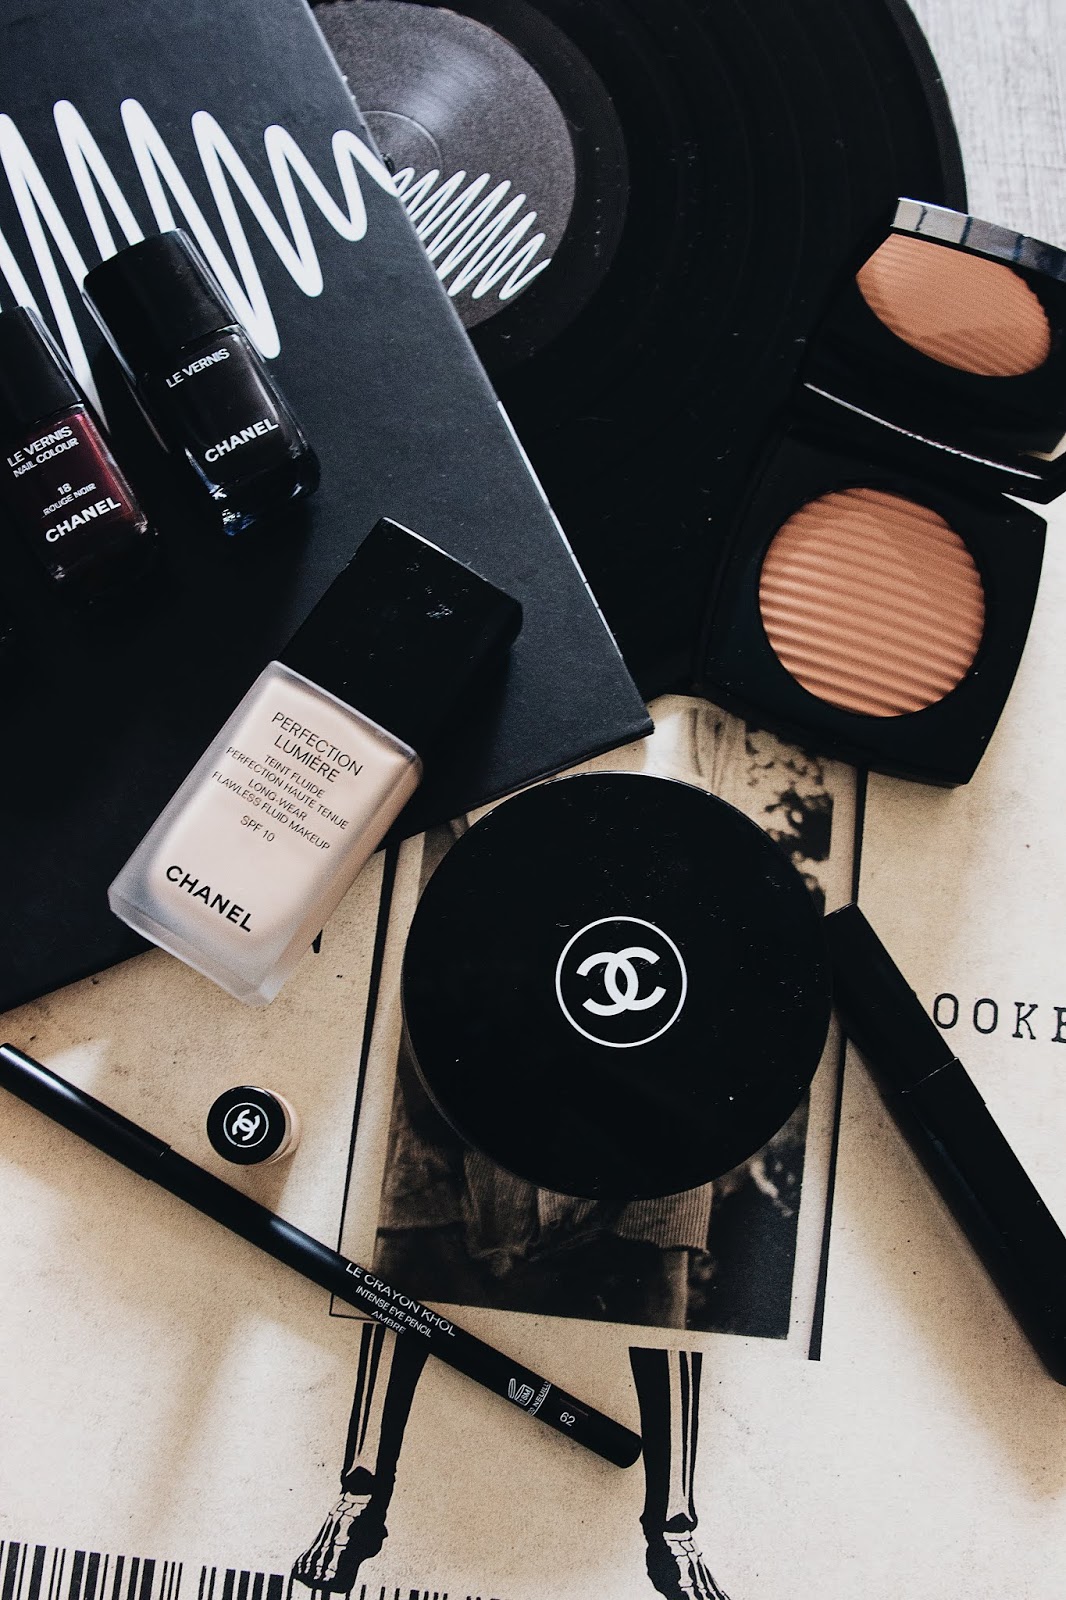
    I recently got my hands on a bunch of Chanel makeup for the first time and I was so excited to put this stuff to the test and see if it's really worth paying the extra money for the name. I've been wearing their makeup on a daily basis lately and have a few thoughts to share.

    Perfection Lumière Foundation

    Testing out Chanel foundation was the part I was particularly excited about. I picked mine up in shade 30 Beige which basically works perfectly for me when I have a bit of a tan. First thing I noticed when applying this foundation is how good it smelt! It has a light perfumed scent to it which just makes you feel extra posh as you apply it (much better than the paint smell that often emanates from some foundations). I don't tend to apply a heavy layer of foundation anymore as I've become more confident with my skin, so a little goes a long way for me. I actually started applying this with a brush - at a time when I was packing everything on with a beauty blender - and I find the finish comes out flawless. It also leaves your skin feeling quite soft and it holds up pretty well with my skins' oils throughout the day. Would definitely recommend giving this one a go if you're in the market for a new higher end foundation.


    Poudre Universelle Libre Natural Finish Loose Powder

    Knowing their foundation stacked up to the test, the next product I was really keen to try out was their powder. I picked this up in the shade 25 Beige, which is more suited to my skin tone without so much tan on and works perfectly to add over the top of the foundation just to lighten it up a little. Again I don't apply a lot of this (sometimes I even just wear it on it's own if I'm having a really good skin day) but I find it's super smooth and silky to apply. I do find the foundation wears against oils pretty well on it's own but I find the powder great for locking in spots of concealer or for a really nice, light finish to the skin. I would say that if you live by your powder this is a great option and worth the money.

    Les Beiges Healthy Glow Luminous Colour in Light

    A bit of a random grab but still not a bad one. This powder has a pink tone and (as you can probably guess by the name) a bit of a glow/shine to it - so I stick to using this in areas where I would normally use highlighter but when I'm not wanting a blinding finish but something a little more natural and subtle. The powder is super smooth and also smells really good - Chanel get 10/10 for making their products smell amazing. I don't feel like this is a 100% you need to go and buy product but if it is something that takes your fancy and gives an effect you love then it's definitely worth grabbing.


    Le Crayon Khol

    I originally thought I would pick up a black eyeliner pencil, but I have to say I'm pretty happy with this dark brown shade I grabbed instead. This eyeliner is super smooth and easy to apply and I find a darker brown still gives a nice edgy look to my eyes without being as harsh as a black liner can be. On nights where I've placed this around my bottom lid I found, while it did wear off over time (as all eyeliners that aren't liquid tend to do) it didn't fall down onto my foundation which is a huge thumbs up for me. I think these eyeliners are definitely worth getting your money out for if you're after a good eyeliner.

    LeVernis Nailpolish

    I have to say, Chanel know how to make a good nail polish - I picked up three different shades, a dark red, a black and a dark purple that is basically almost black. I find their nail polish really easy and smooth to apply and just a light second coat will give you a complete opaque finish. They also last really well on the nail as well - after wearing mine for about a week people were still commenting on my nails thinking I'd just painted them. I honestly think these are worth buying.